Summer ’24 has been a long one—lots of ups, lots of downs. One of those ups has been the work I’ve been doing redeveloping my game Grocery Run in Unreal Engine 5 (it was originally developed in Unity). Now that I’ve made some solid progress on a few of the subsystems, this post kicks off a series where I’ll be sharing some developer insights and progress. Some posts will dive deep into the technical and programming side of things, while others will be more about my general thoughts on design. I’ll be tagging these posts to keep them organized by topic, so if you’re here for the coding or the design philosophy, you can easily find what you’re after.
In this first post, I’ll be breaking down one of the key systems that drive the dynamic behaviour in Grocery Run: a flexible State Machine (SM) that lets me add state and transition definitions through Blueprints and Data Assets without needing to add more C++ code. This system has been a game-changer in keeping things scalable while letting me experiment and iterate quickly.
Understanding the State Machine Pattern (Quick Overview):
So what’s a State Machine (SM), and why bother? A State Machine is a well-established pattern that’s been around for years, both in games and in software architecture more generally. The basic idea is that any object in a game can have a set of behaviours defined by a “state” and at any point, that object can switch from one state to another based on specific logic.
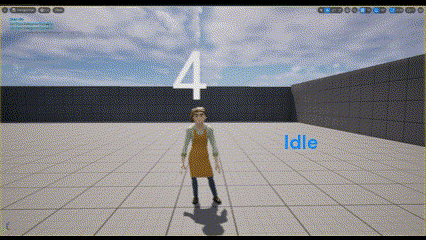
For example, in Grocery Run, the main enemy NPCs are “Karens” with three main states: Idle, Patrol, and Chase (there are more, but I’ll stick to these three for now). When Karen is in the Idle state, she’s playing her idle animation, scanning the environment (by casting rays that detect the player), and a timer tracks how long she’s been idle. The logic here says that if the timer hits a certain threshold, Karen will transition to the Patrol state, where she begins wandering the aisles.
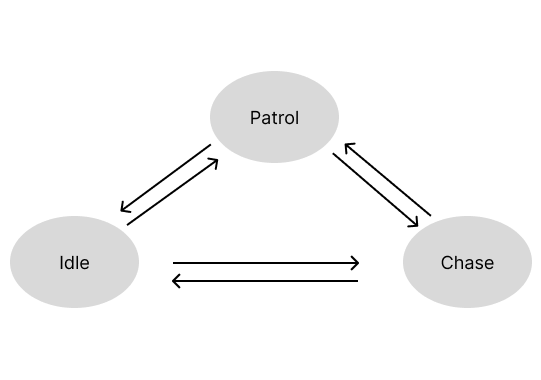
Here’s where the State Machine pattern comes in handy. That switch from Idle to Patrol is called a transition. In a State Machine, states and transitions are handled by a dedicated State class and Transition class. The State Object controls what behaviour happens when initially entering the state, when exiting the state, and when updating each frame. The Transition Object defines the logic that allows changing from one state to another. Instead of burying all of this logic inside a massive if-else chain within the Karen Actor class, it’s abstracted into a logical, organized system.
This separation is what makes State Machines powerful. By breaking behaviours into states and transitions, you can keep everything modular and scalable; The game’s code stays organized and easier to manage as it grows. When you want to add a new behaviour or tweak an existing one, you don’t have to worry about adjusting and potentially breaking everything else. If you’re unfamiliar with the State pattern and want to learn more, I highly recommend checking out the State chapter in Level Up Your Code With Game Programming Patterns.
Taming a Wild Karen
The Big Picture
I bet you’re thinking to yourself, “Zaire’s so cool, he’s implemented something that’s been done a billion times before, very demure, very mindful.” So first of all: 1.) Boo you, I’m sharing what I did anyway and you can’t stop me, and 2.) Seriously though, you should stick around because I genuinely couldn’t find any articles or tutorials that show what I’m about to cover.
One of the coolest things I’m really starting to appreciate about Unreal Engine is how you can use both C++ and Blueprints (visual, node-based programming) to develop a game. For me, writing complex logic in C++ feels natural, but Blueprints make piecing together and tweaking that logic much more dynamic. Here’s what I mean: whenever you want to make a C++ change, you have to close the editor, make the change, rebuild the solution, and then reopen the editor. It’s a process. But with Blueprints, you can recompile directly within the editor—so if something doesn’t work, you can catch and fix it with way less hassle than in C++.
Now using both in tandem is where it gets super dope. You can expose functions, variables, and other class properties to Blueprints, making the C++ code act like an API that handles the more complex stuff while keeping design flexible in Blueprints.
After I decided to implement a generic State Machine, I immediately wanted to build a system that would allow me to create all the components of the State Machine without needing to touch C++ again. That turned out to be more challenging than I anticipated, but I’m happy to say I figured it out!
Here’s a high-level overview of how the system works:
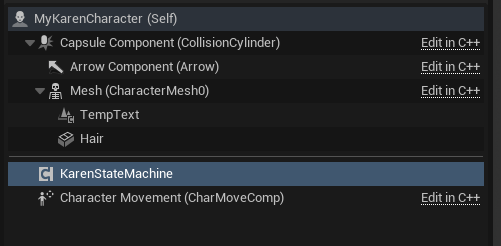
- Attach the StateMachine Component: Start by attaching a StateMachine actor component to the actor that needs the state machine.
- Create and Link State and Transition Data Assets: Create the Data Assets for each State and Transition that make up the State Machine. Link them accordingly.
- Populate the StateMachine with State References: Add references to all relevant State Data Assets into the StateMachine’s States list.
- Bind State Events with Blueprints: Use Blueprints to bind character behaviours to the StateOnEnter, StateOnExit, and StateOnUpdate events. This is where you define what happens when a state is entered, updated, or exited.
- Bind Transition Validation with Blueprints: Use Blueprints to bind Transition Validation Functions (which check character properties) to the TransitionOnValidationCheck event. This determines when and how transitions occur based on conditions you define.
Here’s a visual of the State Machine actor component on the Karen Character Blueprint:
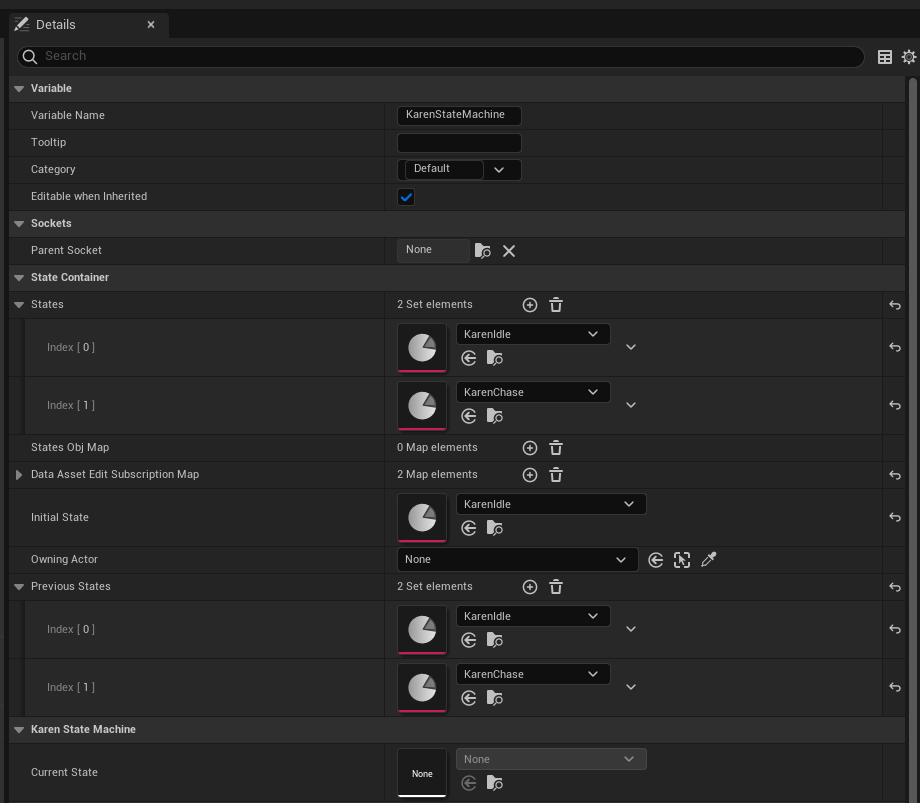
Gathering Karen Together
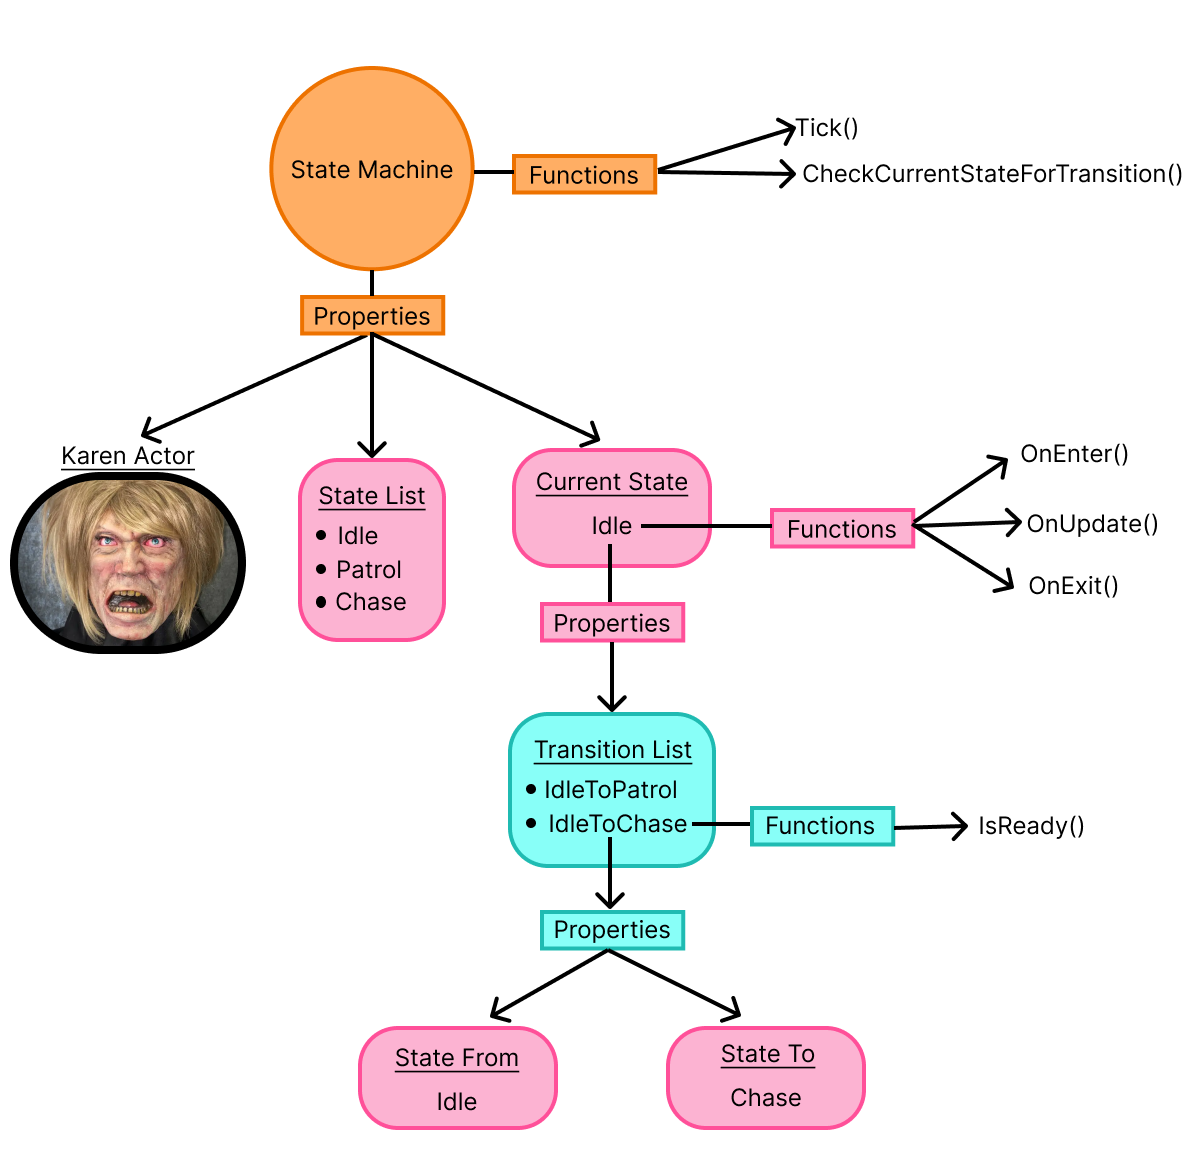
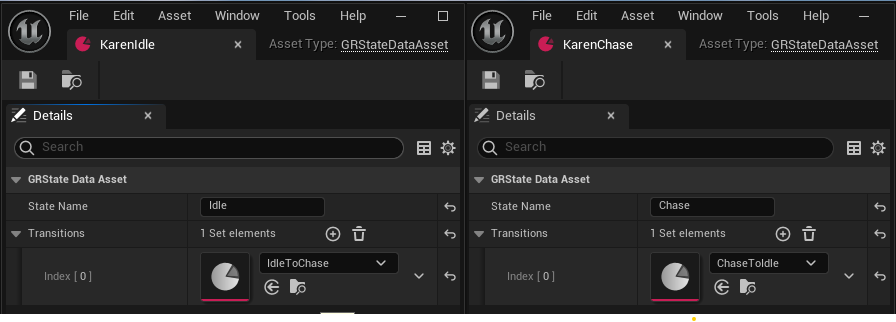
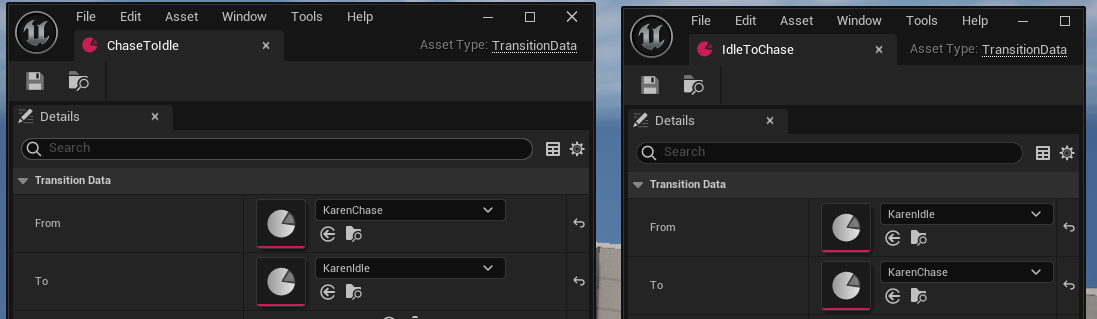
The real MVPs of this system are the Transition and State Data Assets. If you’re familiar with Scriptable Objects in Unity, Data Assets in Unreal work similarly. Users create instances of a class (inheriting from UDataAsset) that live as assets in the project’s Content folder. Since they exist outside of the game, they can be consistently referenced by game objects and other data assets.
In this system, these Data Assets create a bridge between the data they hold and the UObjects that represent them at runtime. Essentially, the Data Assets are blueprints for the runtime objects that do the heavy lifting.
What’s especially powerful is how the State and Transition Data Assets define each other. The State Data Asset holds a list of Transition Data Assets, while each Transition Data Asset contains references to a “From” State Data Asset and a “To” State Data Asset. This setup neatly organizes the relationships between states and transitions, making everything modular and easy to manage.
Because of this Data Asset–Object mapping, users can easily define transition validations and state behaviours. They can reference the Data Assets directly to create the necessary bindings in Blueprints. In other words, the Data Asset serves as a reliable handle that lets the system bind the logic and conditions needed for transitions and behaviours without additional C++ code.
After the State and Transition data assets are created, they are then used to define the State Machine Actor Component (UKarenStateMachine), the State UObjects(UGRBaseState), and the Transition UObjects(UTransition).
// State Machine Class
class UKarenStateMachine : public UActorComponent
{
    UKarenStateMachine();

    // State Machine Update Function
    void TickFSM(float DeltaTime);

    // Checks if a transition should happen from the current state
    void CheckForTransition();

    TSet<UGRStateDataAsset*> States;
    UGRStateDataAsset* InitialState;
    UGrKarenState* CurrentState;
    AActor* OwningActor;

    // Mapping of the State Data Assets(read-only) to State UObjects
     TMap<UGRStateDataAsset*,UGrKarenState*> StatesObjMap;
}DECLARE_DYNAMIC_MULTICAST_DELEGATE(FStateDelegate);
DECLARE_DYNAMIC_MULTICAST_DELEGATE_OneParam(FStateUpdateDelegate, double, DeltaTime);
// State Interface
class UGRState : public UInterface
{
virtual void Enter() = 0;
virtual void Update(float DeltaTime) = 0;
virtual void Exit() = 0;
virtual UObject* GetUObjectPtr() = 0;
}
// State Class -- implements State Interface
class UGRBaseState : public UObject, public IGRState
{
virtual void Initialize(UGRStateDataAsset* dataAsset, UKarenStateMachine* stateMachine);
// Called when transitioning to this state, invokes OnEnter delegate
virtual void Enter() override;
// Called when transitioning out of this state, invokes OnExit delegate
virtual void Exit() override;
// Called per frame/tick while this state is active, invokes OnUpdate delegate
virtual void Update(float DeltaTime) override;
virtual UGRBaseState* CheckTransitionValidations(bool* changed);
// Executes binded behaviour on enter
FStateDelegate OnEnterDelegate;
// Executes binded behaviour on update
FStateUpdateDelegate OnUpdateDelegate;
// Executes binded behaviour on exit
FStateDelegate OnExitDelegate;
FName StateName;
TSet<UTransition*> Transitions;
// Mapping of the Transition Data Assets(read-only) to Transition UObjects
TMap<UTransitionData*, UTransition*> TransitionObjMap;
virtual UObject* GetUObjectPtr() override { return this; }
}// Validation Delegate returning true or false based on validation logic
DECLARE_DYNAMIC_DELEGATE_RetVal_OneParam(bool, FValidationDelegate, const UGRBaseState*, state);
// Transition Class
class UTransition : public UObject
{
virtual void Initialize(const UGRTransitionDataAsset* transitionAsset, UGRBaseState* from);
FName TransitionName;
UGRBaseState* FromState;
UGRBaseState* ToState;
// Invoked when State Machine checks validation for its current state
TArray<FValidationDelegate> ValidationDelegates;
// Set to true if all Validation Deleagtes return true
bool CanTransition;
}Making Karen Rationally Irrational
Now that we’ve got all the pieces in place—Data Assets, State Machine components, and how states and transitions are defined—it’s time to show how this logic actually gets wired up in Blueprints to make our Karen character behave like the true chaotic force she is.
In Grocery Run, all the hard-coded logic and state behaviour exists in C++—but thanks to the power of Data Assets and Blueprints, I don’t have to write more C++ to implement new behaviours or transitions. Instead, I have the option to handle it all visually within the Blueprint editor. Let’s walk through how it works.
Defining State behaviours in Blueprints
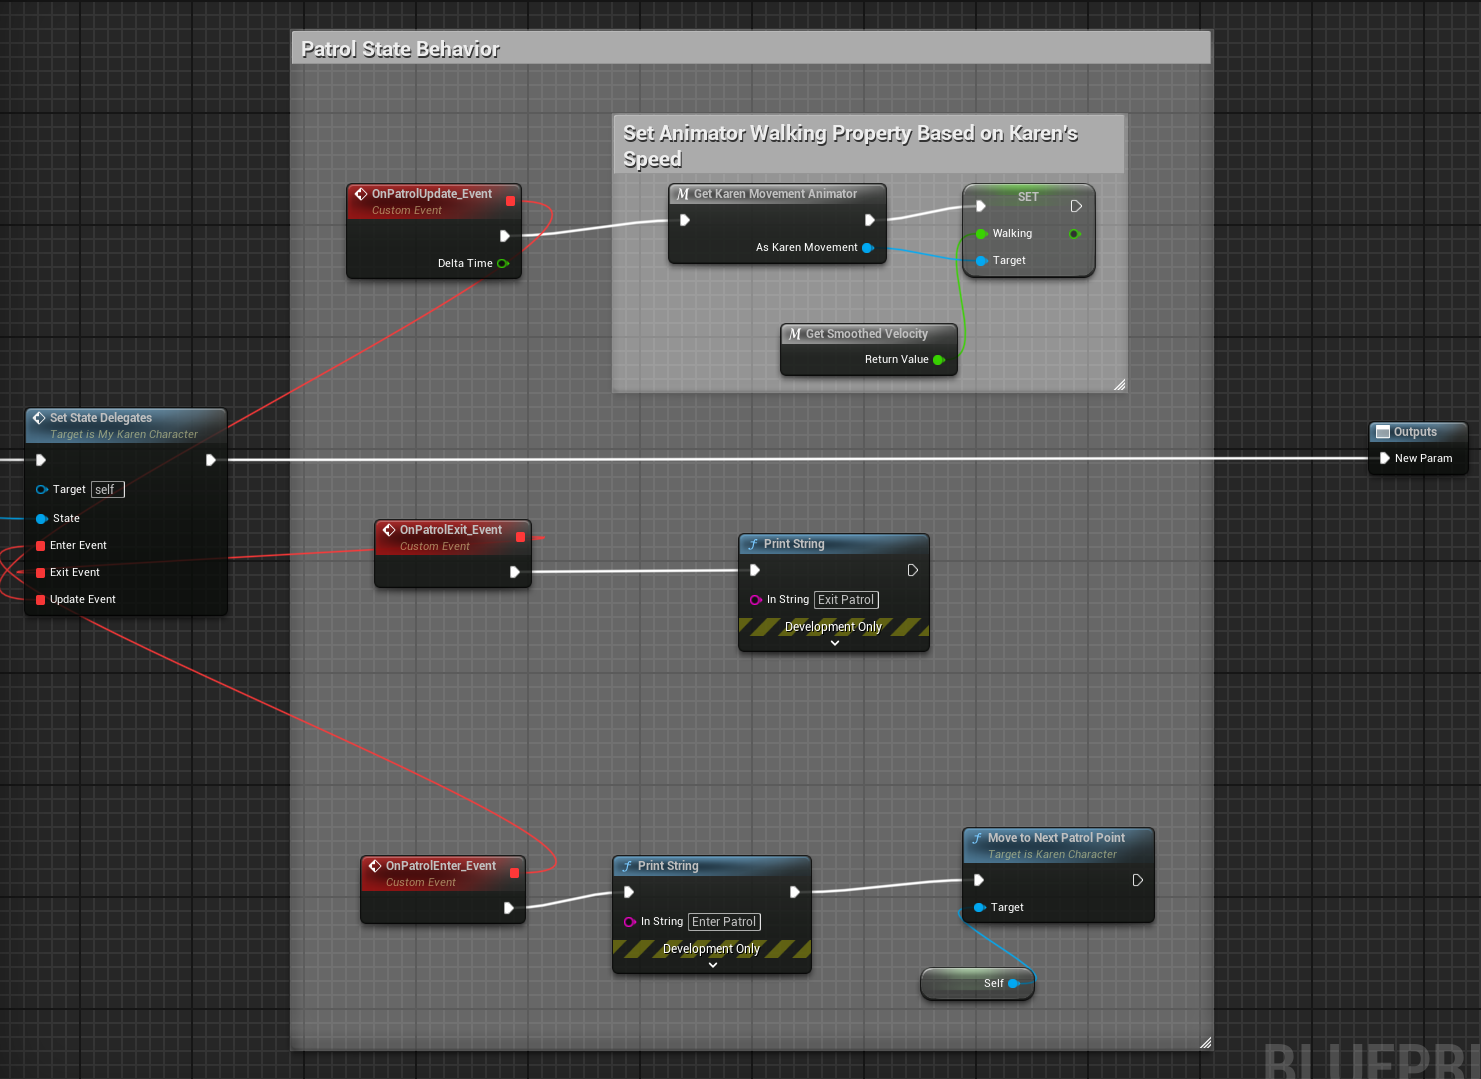
After the State Machine component is attached to Karen’s Actor, I use Blueprints to bind custom behaviour to each state’s OnEnter, OnUpdate, and OnExit events. For example, when Karen enters the Patrol state, I use Blueprints to bind the function that moves her to the next patrol point to the OnEnter event, and also to bind the function that adjusts her walk/run animations based on her speed to the OnUpdate event.
Setting Up Transition Validations
For transitions, I use Blueprints to bind Validation Functions that check conditions for when to move from one state to another. Let’s take the IdleToChase transition as an example. Karen transitions from Idle to Chase when either of the following two conditions are met:
- PlayerTriggeredKarenLineOfSight – This condition becomes true when the player stays in Karen’s view radius for a specific amount of time.
- AllKarensAlarmed – This condition becomes true for all Karens in the scene if the player runs for a set amount of time or if the level time drops below a certain threshold.
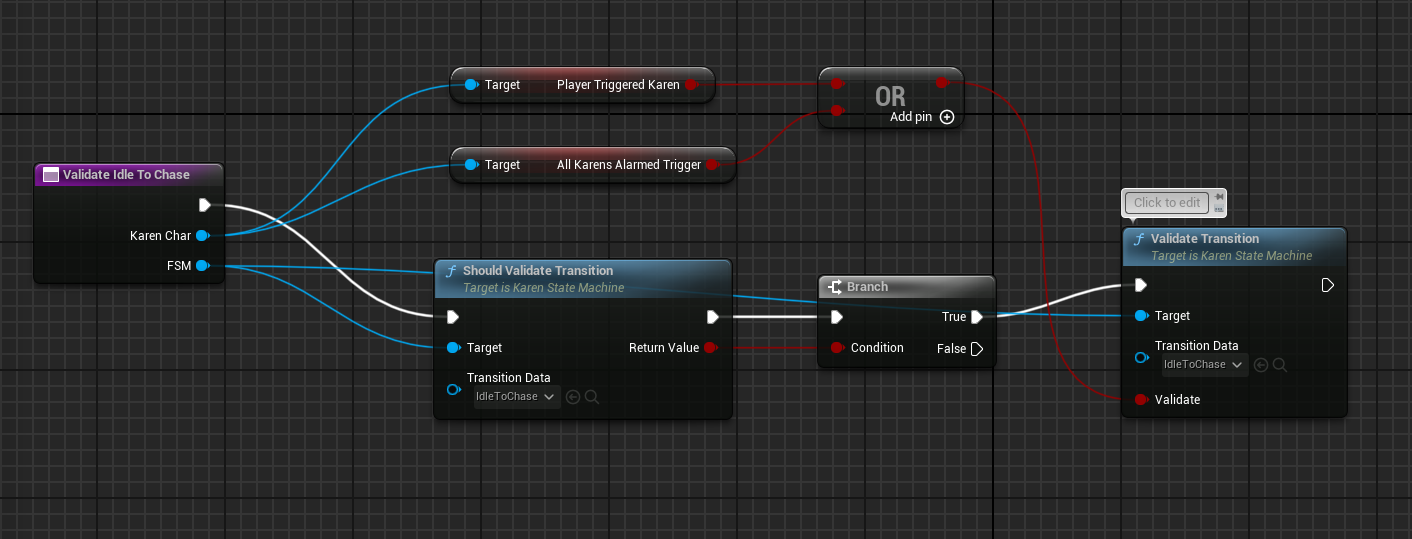
Given the context of the KarenCharacters, If the player lingers in a Karen’s line of sight long enough or the player notifies all Karens through their event subscriptions, the transition to Chase is triggered. That said, the state machine could care less about what the conditions actually represent; the value(true or false) is the only thing that matters. This makes testing the state machine in isolation easy since I can mock any condition without having actually trigger them by manually creating the situations in game.
Big Picture
Here’s how the entire setup for the state behaviour and transition logic looks in Blueprints:
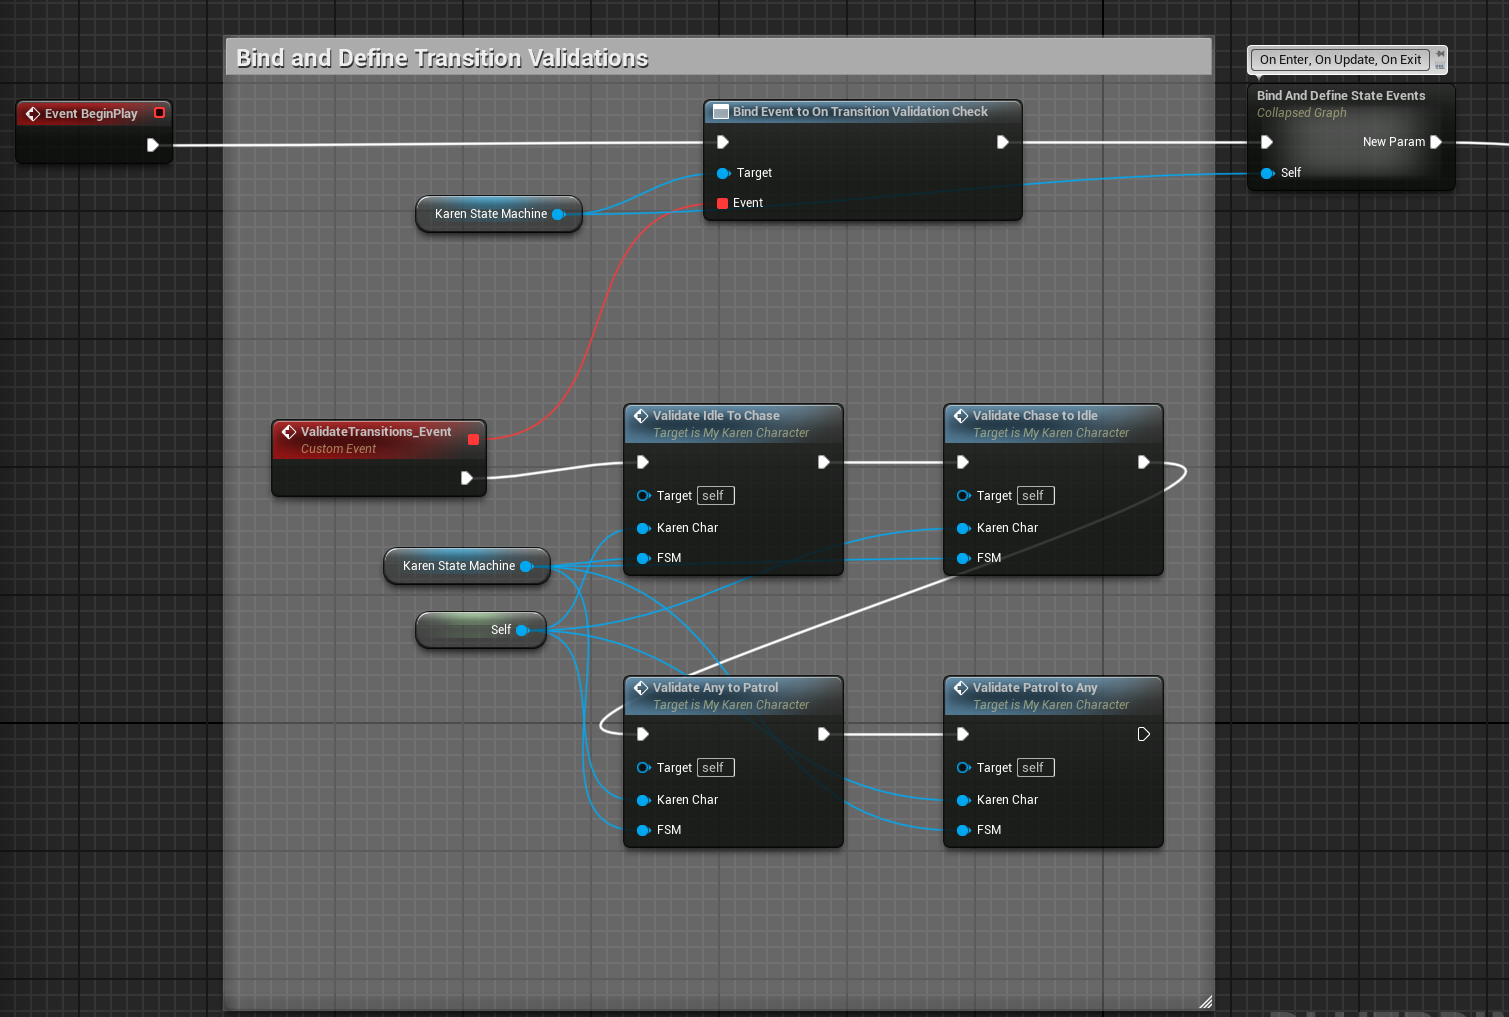
In this Blueprint, I bind the validation for each state’s transition and the behaviours to trigger in all state events to the BeginPlay Event. By combining C++ for the core logic and Blueprints for defining dynamic behaviours, I’ve created a system where the NPC logic is not only modular but also highly customizable. This approach allows me (and any people who’d want to help me work on the game wink wink) to fine-tune Karen’s behaviours quickly and without worrying about breaking the game’s foundation.
Conclusion: Wrangling Karens and Future Improvements
Overall, building this flexible State Machine system has been a pretty big win for me. By separating the logic into manageable pieces and leveraging Unreal’s Data Assets and Blueprints, I can create complex, dynamic behaviours without constantly needing to rewrite C++ code. As a very busy man with a very busy schedule(ie. hitting Master tier in League), this setup has made development much smoother and faster.
However, there are a few potential booboos I’m aware of. One challenge is that with the flexibility comes the risk of mismanagement—if too many complex conditions are added or not kept organized, the system can become difficult to debug or maintain. Although I’m not planning on making Karen’s AI complex, I can definitely see how having 10+ states with a bunch of transitions between them would look pretty gnarly. In addition, heavy reliance on Blueprints for behaviour can sometimes slow down performance compared to C++ if not optimized properly. So, while the Blueprint-C++ hybrid approach offers a lot of power, I definitely plan on balancing to avoid bloat. Also, I would not be surprised if a tool like this already exists in Unreal Engine – if there’s a more elegant approach, I’d most likely want to incorporate that into my current solution. That said, I still value the things I’ve learned while creating this system.
All in all, while there are always ways to improve, this flexible system has laid the groundwork for building Karen encounters that are as unpredictable, dynamic and unecessary as they need to be. I’m excited to keep refining this and exploring new possibilities for making Grocery Run even more upsetting in the best way possible!